For the October F# Game Jam, I made Orb Light, a 1-bit platformer with fading light the player restores by collecting orbs. For this post, I want to share my approach to making games with F#. You can find a subset of the game code here.
Jumping around in the dark
Preparation
Language
F# is a concise, strongly-typed, functional-first language. It’s entirely usable for game development, whether you want to make a turn-based game with idiomatic domain modeling or a high performance real-time game using low-level mutation. F# is mostly equivalent to C# in capabilities, but it’s more concise and has safer defaults.
Dependencies
There are many choices of engine, framework, or libraries to use, each with tradeoffs of control, convenience, support, etc. For Orb Light and prior projects, I’ve cobbled together a few libraries into a toolkit.
Tools
You can find paid or free game assets or just make your own. Even without an artistic background, it’s often easier than you might think if you stick to a low fidelity style and experiment a bit. For pixel art examples, you can look to classic console games to see what styles or tricks they used.
For pixel art, I use Aseprite. You can find minimalist palettes on Lospec, which can help constrain your art (in a good way!).
For sound effects, ‘sfxr’ or its variants are useful for quick sound generation. For editing audio, REAPER is a popular DAW for games.
Brainstorming
Once the jam started, I decided to make a spooky platformer and came up with a few initial ideas:
- Lightning and rain effects
- Unseen beast following the player
- Blinking eyes in the dark
- Bats and spiders
- Spike hazards
- Transparent mist
- Limited light around the player
- Projected shadows as the player moves
- 1-bit graphics with dither
In the end, I decided on simple platformer mechanics with dithered lighting effects and eyes in the dark. This graphics choice added some unknowns, but it allowed me to simplify the art. For a minimal implementation, I aimed for tile and player display, movement physics, lighting effects, and a predefined level.
Architecture
Many modern games use entity component systems (ECS) as an architecture. With ECS, you can represent entities like the player character, projectiles, or enemies as a set of components defining their characteristics or behavior. Systems can then implement those behaviors by querying and iterating over combinations of components, such as a physics system updating all entities with Position, Force, and Velocity components. This approach allows for fast, data-oriented processing and flexibility in defining entities.
With F#, I try to approach problems by first defining domain types and functions, leaning on the type system as much as possible. For ECS, components and events are the domain types, but the logic is split between pure functions and system update and glue code.
Using Garnet, an ECS and event library I wrote, systems can subscribe to events and access shared state such as entities and services (i.e. service locator antipattern). Much of this approach goes against idiomatic F# and static type safety, but it allows for high-performance ECS with little or no garbage collection (compared with immutable data structures which involve allocation). And as the game logic stabilizes, I can gradually extract pieces of it into pure functions.
module HitPoints =
    let increment delta hp =
        { hp with hits = min hp.maxHits (hp.hits + delta) }

module SimulationSystem =
    // Container is the bag of game state and subscriptions
    type Container with
        // As a convention, I tend to use extension methods instead of F#
        // functions when classes or mutation are involved
        member c.UpdatePickup() =
            let maxPickupDistance = 192
            // Expect this query to only include the player
            for r in c.Query<Position, HitPoints, Controlled>() do
                // Since we may modify HP, we need a byref and have to use this
                // ugly syntax instead of accessing via tuple syntax
                let p = r.Value1
                let hp = &r.Value2
                // Look for a powerup within range
                match c.TryGetNearestPowerupEid(p.pos, maxPickupDistance) with
                | ValueSome powerupEid ->
                    // If we're near enough to the power up, modify HP,
                    // remove the powerup, and play a sound
                    hp <- HitPoints.increment 1 hp
                    c.Destroy(powerupEid)
                    c.Send<PlaySound> {
                        SoundKey = "sounds/grab.wav"
                        Playback = SoundPlayback.Default
                    }
                | ValueNone -> ()

        // Other methods here
        // ...

    let add (c : Container) =
        // Event subscription
        c.On<FixedUpdate> <| fun e ->
            // This is the simplest way to run multiple updates in a specific
            // order. If ordering doesn't matter, we could put them in
            // separate subscriptions.
            c.UpdatePickup()
            c.UpdateDamage(e.FixedTime)
Compared with pure functions, it’s a bit of a mess with all the side effects and mixed concerns, although we could improve it a bit by adding a PowerupGrabbed event and moving sounds or other effects to a separate system.
Finally, we can compose all the systems together in Program.fs:
    // This creates a container with all our systems registered, then runs
    // a game loop that sends update events to subscribing systems
    Container.RunLoop <| fun c ->
        c.AddSystems [
            StartupSystem.add
            InputSystem.add
            SpawningSystem.add
            SimulationSystem.add
            DrawingSystem.add
            EffectSystem.add
            AudioSystem.add
            DebugSystem.add
            ]
This kind of architecture might be overkill for a simple game, but it offers flexibility and performance that might be lacking in a pure functional approach. Systems also help modularize the code as complexity increases.
With a small number of entities, Orb Light could probably be written with pure functional code without a noticeable decrease in performance. However, as the number of entities that change each frame increases (such as swarms of floating eyes updating at 60 Hz), it becomes more important to have mutability as an option.
Implementation
Tiling
After setting up a simple ECS project that renders a window, the next item was displaying tiles. The simplest way is to just create a single tile image and repeat that wherever there’s a wall, but we can do better with just a bit more effort by using edge-connected tiles.
We can say a tile is connected to its neighbor if they are both the same type, e.g. both walls. If we consider a square tile with four edges and four corresponding neighbor tiles, there are 2^4 = 16 combinations. Creating those is entirely doable considering all the symmetry, and it’s even easier if you’re working with 8x8-pixel 1-bit tiles.
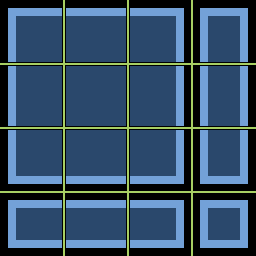
16 combinations of edge tile connectivity
We can efficiently generate geometry for tiles by defining bits for each directional neighbors, then setting the bits to get an index into a table of texture coordinates.
Entities
For entities like the player character, we want to display a sprite facing the movement direction and animated to indicate its current state, e.g. standing, walking, etc. But given the size of the sprite onscreen, I felt it wasn’t worthwhile to spend much time on detailed frames at this point. So I just ensured the shape resembled something vaguely humanoid with eyes and faced the correct direction.
Physics
A general physics engine is a big undertaking, but fortunately we don’t need anything close to that for a simple platformer. We really just want to update velocity with acceleration from player input, apply friction or braking, and detect collisions with tiles.
There are two decisions that can simplify collision logic:
- Use integer coordinates: This avoids floating point precision issues and ensures consistency across all platforms. To allow for smooth movement, I defined each tile to be 256 logical units across.
- Avoid spatial partitioning: Optimizations generally take the form of caching, which means duplicate state that must be properly invalidated. For a small scale without N^2 interactions, spatial partitioning may not significantly improve performance but could introduce complexity or bugs. But definitely use it if you need it!
Each entity hitbox is an axis-aligned bounding box (AABB), which makes for simpler collision testing than more complex or rotated shapes. Given a bounding box, velocity, and tile map, we can determine how far the entity is allowed to move before colliding with a tile. This can be done by advancing the forward edge of the box one unit at a time and testing whether the edge intersects with any tiles.
I already had 3D block collision code for a prior project, so I only needed to make minor modifications to make it work for 2D in this game.
Lighting
I wanted a radius of light around the player, with everything else dark. A typical approach for this is rendering the scene normally, then drawing lights to an offscreen render target and applying it with multiplicative blending to the rendered scene.
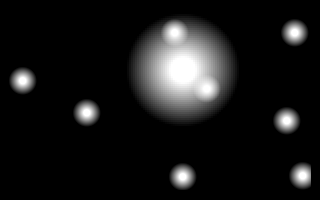
Lightmap sprites from player and orbs
Dithering
I briefly considered making a dithered light sprite, but that wouldn’t work properly when combining lights together or for variable size lights. So it needed to be a shader. Since the lighting is the only non-1-bit drawing, we only need to implement dither in the shader used when blending lighting to the main scene.

Dither with a 4x4 matrix
There are many dithering techniques, but I wanted a simple and regular pattern and went with ordered dithering implemented on the GPU.
Levels
Procedural level generation is fun, but it often turns into a research project and produces unpredictable results. With a short period of time, I instead chose to handcraft prefab level parts and select a random combination of them to form a level. This is similar to the approach taken by Spelunky.
But how big should a level be and how big should the prefabs be? To avoid complications with dither, I chose use a fixed camera rather than a camera tracking the player. This meant the entire level needed to fit on a single screen. With 8x8 pixel tiles, this is 40x22.5 tiles. After trying a few room sizes, I settled on 3x2 rooms * 13x11 tiles, with some amount of leftover space.
Room prefabs are like connected tiles in that we need to match up each edge with the adjacent room. To reduce the number of prefabs needed, I decided that all rooms should be fully connected and the player would always start in the upper left and exit in the lower right. With more time, we could support other topologies by either creating more prefabs or generating connections independently of the rest of the prefab.
Prefabs are stored as images, where each color in the palette represents a distinct kind of tile. This means we can use any pixel editor to edit our maps.
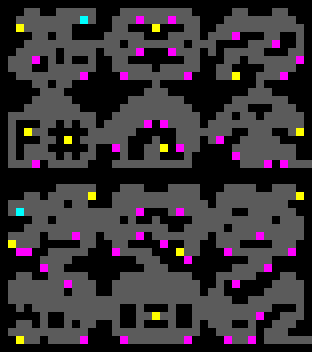
6 rooms * 2 varieties stacked vertically
Floating eyes
I originally intended to add jumping spiders and swooping bats, but I felt that adding an animation system and behaviors would be too time-consuming. At the same time, I wanted something adding time pressure to keep the player moving and ideally interacting with the light system. So I thought of introducing some kind of shadow beast that follows the player through walls but avoids the light, allowing the player to lob light grenades to keep it at bay.
I added a throwing mechanic, along with eyes that use steering behaviors to follow the player while avoiding light. However, I quickly found that orb throwing was awkward, and I wasn’t sure how the eyes would attack. Plus, there was already plenty of gameplay potential just from the jumping alone. So the eyes turned into harmless blobs that follow the player around to help set the spooky mood.
The eyes always follow
The blob steering works by calculating a weighted average steering vector from a seek force and avoidance force. The seek force is the direction to the player. The avoidance force is the weighted sum of vectors to light sources and other blobs, with the weight derived from distance. There are tons of possible variations on this, including holding the previous frame vector and blending the new one in for more smoothness, but this worked well enough for the jam.
Fading light
Without the need to use orbs as an attack, what was the point in collecting them? Another thought was making the player light radius dependent on how many orbs the player had. The light level could then decrease over time, forcing the player to make choices about when and where to collect more orbs and adding time pressure to move forward. However, to allow for a controllable pace and hopefully make the game more accessible, I made it so time only advances when the player initiates movement.
Exploding orbs
But I was still at a loss on what to do about throwable orbs. Although the game could work without a throwing mechanic, I hoped orbs could have multiple uses so the player would need to choose between holding or throwing. So I prototyped an explosion mechanic and added orbs to inaccessible areas on the maps, requiring the player to use orbs to reach those rewards.
The explosion effect is just particles flying out from exploded tiles, with the dither effect applied on top. The screen shake is basically sampling a noise function to translate and rotate the screen, with the amplitude spiking and then decreasing over a short duration.
Throwing an orb to blast terrain
Miscellaneous
Resolution
For pixel art, fewer pixels generally means less time and skill needed to produce workable art. 16x9 is a common aspect ratio, and 320x180 pixels is a good compromise between minimizing the number of pixels and having enough space. To accomodate screens or resized windows that aren’t 16x9, we can pick the highest integer pixel scaling that we can fit in the window, then center the viewport with blank space around.
Ideally we’d always fill the screen, but doing so gives less control to the designer over the player experience and could give players an unfair advantage in some games.
Debug mode
I’ve previously tried a few styles of debug UI using ImGUI, some with multiple tabs, windows, entity inspection, etc. However, I find that I prefer a simple overview with zero or few extra modes. For a simple game, this means pressing F12 shows all the relevant information at once, like FPS, bounding boxes, entity counts, etc.
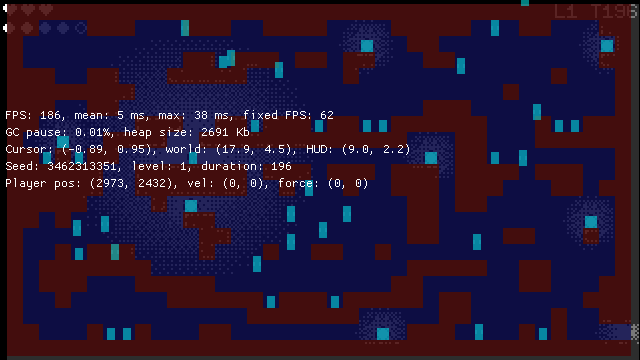
Debug mode
Publishing
When publishing the game as a zip file, I wanted a small number of files, no prerequisites to install, and a small download. Thankfully I’d already gone through this process previously and didn’t need to spend time during this jam on publishing details.
Steps:
- Pack all assets into an archive file
assets.dat - Build with minimal files and size using:
dotnet publish src/Platformer -c Release -p:PublishSingleFile=true -p:PublishTrimmed=true -r win-x64 -o publish/win-x64 - Zip into an archive with version and configuration in the name
If you use Paket, you can save a few megabytes since it uninstalls transitive dependencies that aren’t used. In the end, the the zip came to 14.5 MB with 13 files.
Conclusion
As with the previous jam, the game didn’t come together in its final form until the last day. It’s ideal to nail down the core features early and spend the rest of the time polishing, but my beginning ideas often fail or I discover better ideas along the way. The game itself could be better balanced, especially since it got near impossible by level 6, but I wanted to avoid last-minute tweaks that could break things.
I fortunately didn’t lose much time or momentum to bugs or complex features, which is a pretty big boost to productivity. Some factors:
- Prior experience: Game jams with similar technology mean I’ve already overcome many of the gotchas.
- Taking small steps: First draw anything at all, then draw a grid of things, then moving things, etc. Having a fast feedback loop encourages this.
- Keeping things simple: I try to pick my battles and favor the simple version of a feature, like avoiding animation, using low-resolution art, using a fixed camera, etc.
- Language and paradigm: Strong typing, immutability, and good language tooling go a long way in reducing friction.
For this game, I spent most time on design, graphics, integration, and tweaking rather than core game logic. This means F# domain modeling didn’t have as much chance to shine. In comparison, I’d previously written a turn-based roguelike with a much larger portion of pure functional code where I could take full advantage of F#’s strengths. The good thing with F# is I can use either paradigm as I see fit.